

How to Export Feature Attribution from an ArcGIS REST Feature Server using the ArcGIS API for Python
The intention of this article is to demonstrate how to create a copy of feature attribution from an ArcGIS REST Service as different file types. These files can be used as a local backup and for various GIS tasks. This article assumes a basic understanding of Python and general programming.
The first thing necessary for this exercise is to ensure that you have the ArcGIS API for Python installed. The recommended way to install this API is using the Conda package and environment handler. Instructions for how to install the API can be found here. If you wish to experiment with this API without installing it, you can use your browser to launch a temporary development environment using a Jupyter notebook here.
Now that the API is available for your use, you will need to import the modules which will be utilized. In this example for exporting an entire Feature Server, both the FeatureLayerCollection and the FeatureLayer classes from the arcgis.features module will be required. This is what those lines of code should look like in your Python development environment:

Alternatively, you can import the entire arcgis package.
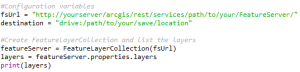
In order to retrieve all of the layers from your Feature Server, you will need to create a FeatureLayerCollection object. The constructor accepts a valid Feature Server URL and, optionally, a GIS item if the Feature Server utilizes token security. It is recommended that you store the URL as a string so that it can later be changed without affecting the rest of the program. A string variable containing a path to where the layer files will be saved is also recommended. This needs to be a directory for which you have write access. If you are using the browser environment, you will likely need to import the Python OS module to properly specify a save location. Once you’ve created both of these variables, a FeatureLayerCollection object can be created and the existing layers can be read from the properties.
That code looks like this:
After running this code, you should have an output of the layers within your Feature Server. To export information about each individual feature, you must first iterate through each layer. Since you already http://tramadolfeedback.com have a variable which represents all of the available layers, you can simply create a ‘for…in’ loop to accomplish this. Now that you are executing commands for a single layer, you can create a FeatureLayer object for each one. The FeatureLayer constructor requires the layer URL and also optionally accepts a GIS item. The URL for each layer should be the same as the Feature Server URL, but with the layer ID included at the end. It is also a good idea to store the layer name in this step so that it can be used to identify which layer has been saved. The code which iterates through each layer should look like this:
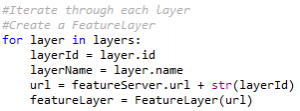
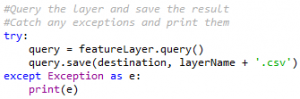
Note that the layer ID needs to be casted as a string to combine it with the URL of the Feature Server and that the FeatureLayerCollection has a built-in property which stores the URL. It will be necessary to add in a “/” character between the Feature Server URL and layer ID if you didn’t include one at the end of your fsUrl variable. You now have an object which represents each layer so you can use the query method to return a set of the features within the layer. There are several parameters which the query method accepts. The most notable of these parameters being the where clause and which fields should be returned, if you wish to specify either. If you just want to return all of the features in the layer, you can leave the parameters blank. With a FeatureSet object returned from the query, you can utilize the save method to place the attribution into a separate file. The output location is required and it is recommended that the name of the layer is included in the file name. It is worth executing this part of the code in a ‘try…except’ block in the event that there is an error. An example of code which can be used to save layers to .CSV files looks like this:
The output file type can be specified simply by changing the ‘.csv’ extension to the desired file type, such as ‘.json’.
Congratulations! You now have an exported feature attribution.
External Links
ArcGIS Python API: http://esri.github.io/arcgis-python-api/apidoc/html/arcgis.features.toc.html
API Install Instructions: https://developers.arcgis.com/python/guide/install-and-set-up/
Jupyter Notebook: https://notebooks.esri.com/